
Machining aluminum is nothing like cutting steel or wood. Aluminum is soft, which sounds like it should be easy to cut. But that softness makes it sticky. Chips weld themselves to cutting edges, flutes clog in seconds, and the tool gets destroyed by built-up edge (BUE) long before it wears out.
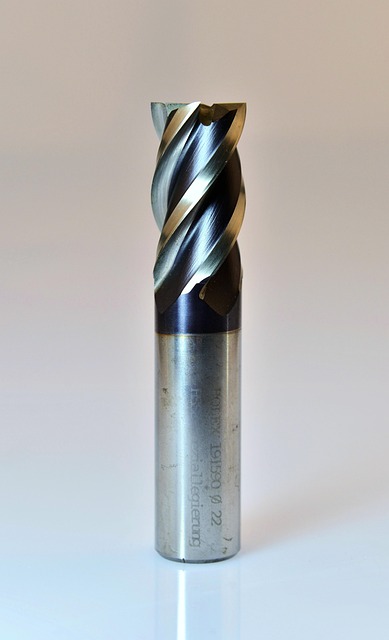
I learned this the hard way. My first attempt at machining aluminum used a 4-flute TiAlN-coated end mill left over from a steel job. The flutes packed with aluminum within 30 seconds, the tool started squealing, and by the time I hit the feed hold, the cutting edges were coated in welded aluminum. That $25 end mill was scrap.
This guide covers everything you need to machine aluminum successfully: the right tools, the correct parameters, coolant strategies that actually work, and the specific adjustments needed for desktop CNC routers versus industrial mills.
Why Aluminum Is Different from Other Materials
Key Differences from Steel and Wood
Aluminum behaves differently from steel and wood in three ways that affect every machining decision:
| Property | Aluminum (6061) | Steel (1018) | Effect on Machining |
|---|---|---|---|
| Hardness | 95 Brinell | 126 Brinell | Aluminum is softer — easier to cut but easier to damage surface |
| Melting point | 660°C | 1,370°C | Low melting point means chips weld to tools without proper coolant |
| Thermal conductivity | 167 W/mK | 52 W/mK | Aluminum pulls heat away from the cut — good for the tool, bad for chip welding |
| Elastic modulus | 69 GPa | 200 GPa | Aluminum flexes more — thin walls chatter easily |
The low melting point and high ductility create the #1 challenge: built-up edge (BUE). When aluminum chips get hot, they weld to the carbide cutting edge. The welded material changes the tool geometry, increases cutting forces, and eventually breaks off, taking carbide particles with it.
The Built-Up Edge Problem
Built-up edge is the single biggest cause of tool failure in aluminum. It happens when aluminum chips weld to the cutting edge due to heat and pressure. The welded aluminum changes the effective geometry of the tool, making it cut poorly. As the BUE grows, it eventually breaks off, taking carbide particles from the cutting edge. This process repeats until the tool is destroyed. The solution is proper tool coating, adequate chip load, and coolant.
The Right Tooling for Aluminum
End Mill Selection
| Specification | Recommendation | Why |
|---|---|---|
| Flute count | 2 or 3 flutes | Maximum chip clearance — 4-flute tools clog |
| Coating | Uncoated polished, ZrN, or DLC | TiAlN/AlTiN cause chip welding |
| Helix angle | High (40-55°) | Smooth shear cut, better chip evacuation |
| Substrate | Solid carbide | Sharpest edge, best wear resistance |
Uncoated carbide with polished flutes is the gold standard for aluminum. The polished surface reduces friction and prevents chips from sticking. It is also the most affordable option.
ZrN (zirconium nitride) coated end mills are specifically designed for non-ferrous materials. The coating has low affinity to aluminum and provides better wear resistance than uncoated tools.
DLC (diamond-like carbon) coated end mills offer the lowest friction and best chip evacuation, but cost significantly more. They are worth it for production work.
Never use TiAlN or AlTiN coatings on aluminum. The aluminum content in these coatings creates a chemical bond with the workpiece aluminum, causing instant built-up edge. I have seen a TiAlN-coated end mill fail in under 10 seconds on aluminum.
Tool Holding
Runout is critical for aluminum. A tool that runs out by more than 0.0005“ will produce poor surface finish and accelerate tool wear. Use a high-quality ER collet and indicate the runout before cutting. If your collet runout exceeds 0.001“, replace the collet or use a hydraulic or shrink-fit holder for aluminum work.
Feeds and Speeds for Aluminum
The Formulas
RPM = (SFM × 3.82) / Tool Diameter (inches)
Feed (IPM) = RPM × Flutes × Chip Load
For 6061 aluminum with carbide tooling:
- SFM range: 800-1,500 (start at 800 for beginner)
- Chip load: 0.002-0.005“ per tooth (start at 0.003“)
Recommended Starting Parameters
| Tool Diameter | Flutes | RPM (at 800 SFM) | Feed Rate (IPM) | Axial DOC | Radial DOC |
|---|---|---|---|---|---|
| 1/8“ (3mm) | 2 | 24,400 | 146 | 0.5× dia | 0.3× dia |
| 1/4“ (6mm) | 2 | 12,200 | 73 | 0.5× dia | 0.4× dia |
| 1/4“ (6mm) | 3 | 12,200 | 110 | 0.5× dia | 0.4× dia |
| 3/8“ (10mm) | 3 | 8,100 | 73 | 0.4× dia | 0.4× dia |
| 1/2“ (12mm) | 3 | 6,100 | 55 | 0.3× dia | 0.4× dia |
For desktop CNC routers with limited rigidity: Reduce axial depth of cut to 0.3× tool diameter and radial engagement to 0.2× diameter. Reduce feed rate by 30%. If you hear chatter, reduce depth of cut further.
How Chip Load Affects Surface Finish
Chip load is the single most important parameter for surface finish in aluminum. Too low and the tool rubs, creating heat and poor finish. Too high and the tool deflects, leaving a rough surface and potentially breaking.
The ideal chip produces a clean, curled chip that falls away from the cut without welding to the tool. If your chips are:
- Fine dust: Feed rate is too low. Increase feed or reduce RPM.
- Long stringy chips: Feed rate is slightly low. Increase feed in small increments.
- Short curled chips (ideal): Parameters are correct. Keep cutting.
- Blue or brown chips: Too much heat. Increase coolant flow or reduce cutting speed.
- Welded to the tool: Chip load is too low, coolant is insufficient, or wrong coating. Stop immediately and fix before continuing.
Depth of Cut Strategy
For aluminum, depth of cut follows different rules depending on the operation:
Roughing: Take the deepest cut your machine can handle without chatter. On a rigid mill, this means 0.5× tool diameter axial and 0.4× radial. On a desktop router, reduce to 0.2× axial and 0.2× radial. The goal is material removal rate — surface finish does not matter during roughing.
Finishing: Take light cuts at high feed rate. Axial depth of 0.005-0.020“ with a clean, sharp tool produces mirror finishes on 6061 aluminum. The key is maintaining consistent chip load — do not reduce feed rate on finishing passes or the tool will rub.
Slotting: Avoid full-width slotting in aluminum whenever possible. A tool engaged 180 degrees has no room for chip evacuation. Use adaptive clearing or trochoidal toolpaths to keep engagement below 50 degrees. If you must slot, reduce feed rate by 50% and use plenty of coolant.
Feeds and Speeds for Desktop CNC Routers
Desktop CNC routers cut aluminum differently than mills. Machines like Shapeoko, Onefinity, and Genmitsu can cut aluminum successfully, but the parameters are different from industrial mills:
| Tool | Mill Feed (IPM) | Router Feed (IPM) | Router DOC |
|---|---|---|---|
| 1/8“ 2-flute | 146 | 60-80 | 0.010-0.015“ |
| 1/4“ 2-flute | 73 | 35-50 | 0.015-0.025“ |
| 1/4“ 3-flute | 110 | 50-70 | 0.015-0.025“ |
| 3/8“ 3-flute | 73 | 35-45 | 0.020-0.030“ |
The primary limitation on routers is rigidity, not power. A 2.2 kW spindle on a Shapeoko can spin fast enough for aluminum, but the aluminum extrusion frame flexes under cutting loads. Take lighter cuts and let the machine take multiple passes.
Chip Load Reference
| Tool Diameter | Min Chip Load | Starting Point | Max Chip Load |
|---|---|---|---|
| 1/8“ | 0.001“ | 0.002“ | 0.004“ |
| 1/4“ | 0.002“ | 0.003“ | 0.006“ |
| 3/8“ | 0.003“ | 0.004“ | 0.007“ |
| 1/2“ | 0.003“ | 0.005“ | 0.008“ |
The most important rule for aluminum: Do not run too slow. When the feed rate is too low for the RPM, the tool rubs instead of cutting. Rubbing generates heat, which causes chip welding. You want chips, not dust. If you see fine dust instead of chips, increase feed rate or reduce RPM.
Coolant — Not Optional for Aluminum
You cannot machine aluminum production work without coolant. The heat generated at the cutting edge will weld chips to the tool within seconds on dry cuts.
Coolant Options Compared
| Method | Cost | Effectiveness | Best For |
|---|---|---|---|
| Flood coolant | $200-$500 | Best | Production, long runs, rigid machines |
| Mist coolant | $50-$150 | Good | Desktop CNCs, hobby machines |
| WD-40 | $5 | Fair | Small jobs, manual application |
| Air blast | $30-$80 | Fair (cooling) / Poor (lubrication) | Finishing passes only |
| Dry cutting | $0 | Poor | Not recommended for beginners |
My coolant setup: I use a simple mist coolant system ($80) on my desktop CNC router. It sprays a fine mist of water-soluble coolant at the cut zone. The difference between cutting aluminum dry and with mist coolant is night and day — surface finish goes from rough to mirror-like, and tool life increases 5x.
If you cannot afford a coolant system, use WD-40. Spray the cutting zone before the tool engages and every few passes. It is not as effective as flood or mist coolant, but it prevents chip welding and is better than cutting dry.
Coolant Application Tips
Position the coolant nozzle so the stream hits the cutting edge directly where the tool meets the workpiece. For flood coolant, aim the nozzle from the side of the cut so chips are washed away from the cutting zone. For mist systems, keep the nozzle within 2-3 inches of the cutting edge for maximum effectiveness. If chips are not clearing from the flutes, increase coolant flow or switch to a tool with fewer flutes for better chip evacuation.
Toolpath Strategies for Aluminum
Adaptive Clearing (HEM)
Adaptive clearing maintains a constant radial engagement angle throughout the cut. Instead of a straight slot where the tool is engaged 180 degrees, adaptive toolpaths keep engagement at 30-50 degrees. This reduces heat buildup, eliminates shock loading, and allows higher feed rates.
Result: 25-35% faster roughing and 40-60% longer tool life compared to traditional slotting.
Climb vs Conventional Milling
| Strategy | Surface Finish | Tool Deflection | Best For |
|---|---|---|---|
| Climb milling | Better | Pulls into the cut | Rigid machines, finishing |
| Conventional milling | Worse | Pushes away from cut | Low-rigidity machines, roughing on desktop CNCs |
For desktop CNC routers: Use conventional milling for roughing (reduces load on the machine) and climb milling for finishing passes.
Aluminum Alloy Comparison
| Alloy | Machinability | Strength | Best For |
|---|---|---|---|
| 6061-T6 | ★★★★★ | ★★★★ | The default choice for beginners — easy to machine, good strength, great surface finish |
| 7075-T6 | ★★★★ | ★★★★★ | Aerospace and high-stress parts — harder on tools, better mechanical properties |
| 2024-T3 | ★★★★ | ★★★★ | Aircraft structures — excellent fatigue resistance |
| 5052-H32 | ★★★ | ★★★ | Marine parts, enclosures — easy to form but gummy to machine |
| MIC-6 | ★★★★ | ★★★ | Cast tooling plate — extremely flat and stable, no internal stresses |
For your first aluminum project: Buy 6061-T6. It is the most forgiving, most widely available, and most documented alloy for CNC machining.
Picking the Right Alloy
If you need maximum strength, use 7075-T6. For marine or formed parts, use 5052-H32. For cast plates requiring flatness, use MIC-6. For most general-purpose machining, stick with 6061-T6 — it offers the best balance of machinability, strength, and cost.
Alloy Selection Tips
When choosing an aluminum alloy for CNC, consider three factors: machinability (how easily it cuts), strength (finished part properties), and availability (can you buy it locally). 6061-T6 scores high on all three, which is why it is the default choice. For production parts requiring maximum strength, 7075-T6 is worth the trade-off in tool wear.
Desktop CNC Router vs Mill — What Changes
| Factor | Industrial CNC Mill | Desktop CNC Router |
|---|---|---|
| Max depth of cut | 0.5× tool diameter | 0.2-0.3× tool diameter |
| Feed rate | Full calculated feed | Reduce by 30-50% |
| Radial engagement | 40-50% of tool diameter | 15-25% of tool diameter |
| Coolant | Flood required | Mist or WD-40 |
| Max RPM | 10,000 | 20,000+ (fine for aluminum) |
| Climb mill? | Yes | Only for finishing |
| Tool selection | Same | Same — 2 or 3-flute carbide |
Desktop CNC routers can cut aluminum successfully — I do it regularly. The key is accepting that you will take lighter passes and cut slower. A job that takes 10 minutes on a mill might take 30 minutes on a router. But the result can be equally good.
Key Adjustments for Routers
On a desktop router, use conventional milling for roughing (reduces load) and climb milling for finishing (better surface finish). Keep radial engagement at 15-25 percent of tool diameter. Use mist coolant or WD-40 rather than flood coolant to avoid mess. Listen for chatter and reduce DOC immediately if you hear it.
Router vs Mill Summary Table
The table above shows the specific parameter differences. The most important takeaway: reduce depth of cut by half when moving from a mill to a router. If your mill program uses 0.050“ DOC, start the router at 0.025“ DOC and adjust based on results. With patience, a desktop router produces aluminum parts that look and function as well as those from a mill.
My First Aluminum Project — What Went Wrong
My first aluminum part was a simple mounting bracket in 6061 aluminum. I had been cutting wood and MDF for months and thought aluminum would be straightforward.
Mistake #1: I used the same 4-flute TiAlN end mill I used for steel. The flutes packed with aluminum in under 30 seconds.
Mistake #2: I ran without coolant because “aluminum is soft, it should cut fine.” The chips welded to the tool, the tool started rubbing, and the surface finish looked like sandpaper.
Mistake #3: I kept going instead of stopping to diagnose the problem. I assumed the tool was dull and increased spindle speed to compensate. That just made the chip welding worse.
Result: $25 end mill destroyed, $15 of aluminum scrapped, 45 minutes of wasted cutting time.
Surface Finish Troubleshooting Table
| Problem | Likely Cause | Fix |
|---|---|---|
| Rough surface, visible tool marks | Feed too fast for RPM | Reduce feed or increase RPM |
| Shiny patches, galled surface | Built-up edge | Increase coolant, check coating, increase chipload |
| Chatter marks on surface | Machine vibration or DOC too high | Reduce depth of cut, check workholding rigidity |
| Burrs on edges | Dull tool | Replace end mill |
| Tool leaves lines on finish pass | Tool deflection | Reduce radial engagement, use shorter tool stickout |
| Surface looks burned | Too much heat | Increase coolant flow, reduce RPM, increase feed |
What I should have done: 2-flute uncoated carbide end mill, mist coolant, 0.020“ depth of cut at 60 IPM with a 1/4“ tool. The part would have taken 20 minutes and looked great.
Lessons for Every Beginner
The three mistakes I made are the same three mistakes every beginner makes: using the wrong tool (4-flute with TiAlN), no coolant, and ignoring the symptoms. If your aluminum cut sounds wrong, stop immediately. Check the tool for chip welding. Verify coolant is reaching the cut zone. Adjust chip load. These three checks take 30 seconds and prevent destroyed tools and scrapped parts.
Decision Flowchart
Quick Decision Guide
Follow this chart to select the right approach for your aluminum job:
flowchart TD
    A[Cutting aluminum?] --> B{Which machine?}
    B -->|Industrial Mill| C[2 or 3-flute carbide<br>Uncoated polished or ZrN]
    B -->|Desktop Router| D[2-flute carbide<br>Reduce DOC by 50%]
    C --> E{Coolant?}
    D --> E
    E -->|Flood coolant| F[Full feeds and speeds]
    E -->|Mist or WD-40| G[Reduce feed by 20%]
    E -->|None| H[Not recommended<br>If forced: reduce speed 40%]
    F --> I[Start: 0.003\" chip load<br>800 SFM]
    G --> I
    I --> J{Listen for}
    J -->|Squealing| K[Increase feed or reduce RPM]
    J -->|Chatter| L[Reduce DOC or radial engagement]
    J -->|Smooth hum| M[✅ Optimal cut]
How to Use This Flowchart
Start at the top with your machine type. Follow the coolant branch that matches your setup. Use the starting parameters at the bottom and listen for the cut sound. Adjust based on what you hear — a smooth hum means the parameters are correct.
FAQ
Common Questions
What is the best end mill for CNC machining aluminum?
A 2-flute or 3-flute uncoated solid carbide end mill with polished flutes is best for aluminum. Never use TiAlN or AlTiN coated tools — the aluminum in the coating causes chip welding.
Do I need coolant when machining aluminum?
Yes. Coolant prevents built-up edge, evacuates chips, and controls heat. Flood coolant is best, but mist coolant or even WD-40 applied manually works for hobby machines.
Why does my end mill keep clogging with aluminum?
You are likely using a 4-flute end mill, which has insufficient chip clearance for aluminum. Switch to a 2-flute or 3-flute tool. Also check that you are using coolant.
Can I cut aluminum on a desktop CNC router?
Yes, with limitations. Use light cuts (0.010-0.030" depth), a sharp single-flute or 2-flute carbide end mill, mist coolant or WD-40, and reduce feed rates.
What is the best aluminum alloy for beginners?
6061-T6 aluminum is the best choice for beginners. It machines well, is widely available, and produces good surface finish.
Quick Tips Summary
Success with aluminum comes down to three things: 2-flute or 3-flute carbide end mill (never 4-flute), coolant (mist, flood, or WD-40), and correct chip load (0.002-0.005“ per tooth). If you get these three right, aluminum machining becomes straightforward.
Related Guides
Essential Reading
- CNC End Mill Selection Guide — How to choose the right tool
- Feeds and Speeds for Beginners — Calculate cutting parameters
- CNC Spindle Guide — Choose the right spindle for aluminum
- CNC Shop Starter Kit — Coolant and workholding recommendations
Next Steps
Once you have the basics of aluminum machining down, practice with a simple project like a mounting bracket or heat sink. Start with 6061-T6, use the recommended parameters from this guide, and adjust based on what you see and hear. Document your successful settings for each tool and material combination.
 CNC Toolpath Troubleshooting Guide: Fix Bad Cuts and Improve Surface FinishJune 27, 2026 · Guides
 CNC End Mill Selection Guide: Types, Coatings, Flutes, and MaterialsJune 22, 2026 · Guides
 Aluminum on a Desktop CNC Router: Can It Be Done? A Realistic GuideJune 27, 2026 · Guides